In the spirit of sharing back to the community, I thought I would share my adaptation to the ImageGallery widget to facilitate rendering out an interactive 360 pano image using Google's VR for Web.
To complete the project you might want to install the Spectrum.Color Picker. Alternatively you can use the built in Umbraco color picker, however its rather limited and I recommend using the Spectrum but its not absolutely required.
1: Download required Google scripts Download the Google VR web scripts from https://github.com/googlevr/vrview
This is required because the vrview scripts should be hosted on your own site due to XSS security issues. Due to XSS, many browsers won't properly render the pano if the scripts come from google but the image is referenced on your site.
2: Install the google scripts: In your /Scripts folder create a "vr" folder. Into that, place the index.html and style.css files from the google zip file. You can also use index-minified.html but you need to rename it to index.html on your server. It uses the -min scripts instead of the full ones. Also copy the "images", "script"s and "build" folders from the google download into the new vr folder.
3: Edit ImageGalleryItem Document type: You will need to add a new tab with three new properties to the ImageGalleryItem Document type. The adds are seen here:
The details of the dropdown are here:
This adds a checkbox to indicate its a 360 image, an image rendering position (needed for images that are not perfectly 2:1 ratio such as those from the 360fly camera), and a color fill which is used for images that don't match the 2:1 ratio required for google vrview. If your images are all 2:1 ratio the pad nor the color will ever be evident on the page.
4: Edit siteTemplate: You need to add a snippit of code to the bottom of your siteTemplate:
You will find the two @Html lines already at the bottom. Add the Script between them.
This tells color box to render that specific class as an iframe rather than an image. You can adjust the % sizes to suit your site's layout though this remains responsive by using % instead of fixed pixel sizes. The google renderer will also adapt to the iframe size within the color box.
5: Generate Models: Generate your models using the model builder on the dev tab.
6: Edit SectionImageGallery Partial: Edit your "SectionImageGallery" partial. Add this using:
@using Umbraco.Web.Models;
7: Further edit SectionImageGallery Partial: Also within "SectionImageGallery" partial, alter this section of code:
The "// TODO" line was present in my partial and I have included it here as a marker for you to locate the proper section of the partial.
What this section of code does is check if the 360 checkbox was checked (bool variable).
It then sets up a few strings with the default values used before so normal images render as they did before.
If its a 360 image, instead of the stock links and classes, it generates a new link to the index.html renderer along with the appropriate GetCropUrl URL to generate the new image. It adds "image360Thumb" class to the image in case you wanted to use CSS to alter its appearance in the gallery. You can, of course, target it also by using the "cbox-gallary360" which is applied to the anchor wrapping it.
Note the resize dimensions in the url. Mine are set for the default size of my 360fly camera's output which is slightly under 4k. The output size must be a 2:1 ratio or the google vr renderer will not apply it to the sphere correctly. This is the reason for the pad and the fill color as my camera produces a 360 horizontal by 270 vertical view not 360 x 360. So if your camera produces a 360 by 360 view, your width is 4096 , your height needs to be 2048 in the url above (or whatever your maximum resolution is on your camera).
The code above also includes an overlay image as part of the new URL. You will need to enable image overlay in your imageprocessor config file and provide a PNG overlay icon. If you do not wish to use the overlay, simply comment out that line of code so you will have it as reference should you wish to re-enable it later.
I used a public free image for my initial testing.
You can see the icon overlay on the last two images here:
If your entire gallery is all 360 panos, the overlay is pointless. But if you have normal images mixed with 360 panos, the user might like to see the 360 icon as an indicator on the thumbnail. It is, of course, your option whether to add the overlay or not, its not required to make this work.
8: Test: Add a 360 image from the /examples/gallery folder from the google download. Check the 360 checkbox and publish. It should render as an interactive pano. Now you can experiment with your own panos!
You can alter the index.html and style.css in your vr folder to suit your site's styling and requirements. It should work out of the box and get you going.
I won't pretend I got it all with a quick read, but I'm definitely giving you a H5YR for this! I'll study it and, why not, include it in a next update if possible. Good work! Cheers!
Thank you sir. It honestly took far longer to figure out how to do it than actually doing it :) The changes are fairly minor. Hardest was working out what to change.
I just recently got my 360 camera and I figured as I started getting nicer weather around here I would get more opportunities to go shoot (both with it on the drone and from the ground).
As you can see I had a couple test shots from a rare nice day in Feb here (back to snow and 14f temps now). I know 360 panorama stuff is becoming more and more popular so I figured there might be someone else out there with an interest in including the pano renderer on their sites. There are so few places on the web to post your panos (outside google), it seemed a natural extension of the image gallery.
I am also going to look at the portfolio and see about adding the content there too.
And I have already created a new page widget to put panos as an inline item on a page as well though that is still in testing. A demo of this can be seen here: http://www.wolfiesden.com/pano-test/ This type of insertion would be perfect for putting the pano content on more elaborate pages, perhaps a site walkthrough or other uses where a specific layout would be required which could include other content widgets such as text areas or even an image gallery in addition to the inline pano. This would be perfect as a showroom page for a business.. As I said, its not complete yet but I can share that methodology as well once its further along.
Adding Interactive 360 Pano Ability to Image Gallery
In the spirit of sharing back to the community, I thought I would share my adaptation to the ImageGallery widget to facilitate rendering out an interactive 360 pano image using Google's VR for Web.
To complete the project you might want to install the Spectrum.Color Picker. Alternatively you can use the built in Umbraco color picker, however its rather limited and I recommend using the Spectrum but its not absolutely required.
1: Download required Google scripts Download the Google VR web scripts from https://github.com/googlevr/vrview This is required because the vrview scripts should be hosted on your own site due to XSS security issues. Due to XSS, many browsers won't properly render the pano if the scripts come from google but the image is referenced on your site.
2: Install the google scripts: In your /Scripts folder create a "vr" folder. Into that, place the index.html and style.css files from the google zip file. You can also use index-minified.html but you need to rename it to index.html on your server. It uses the -min scripts instead of the full ones. Also copy the "images", "script"s and "build" folders from the google download into the new vr folder.
3: Edit ImageGalleryItem Document type: You will need to add a new tab with three new properties to the ImageGalleryItem Document type. The adds are seen here: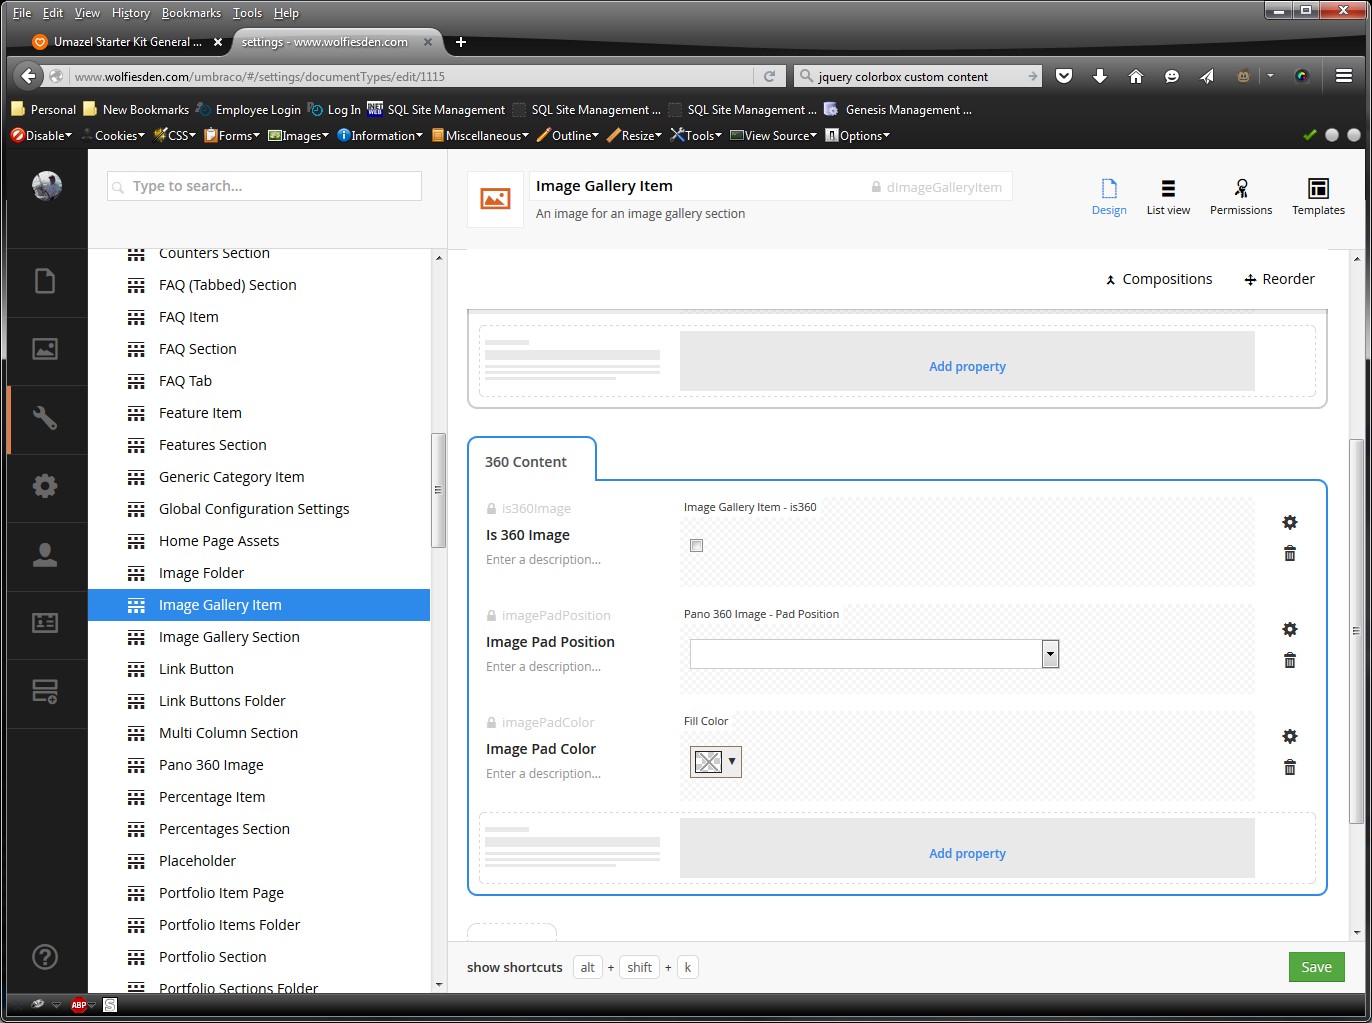
The details of the dropdown are here: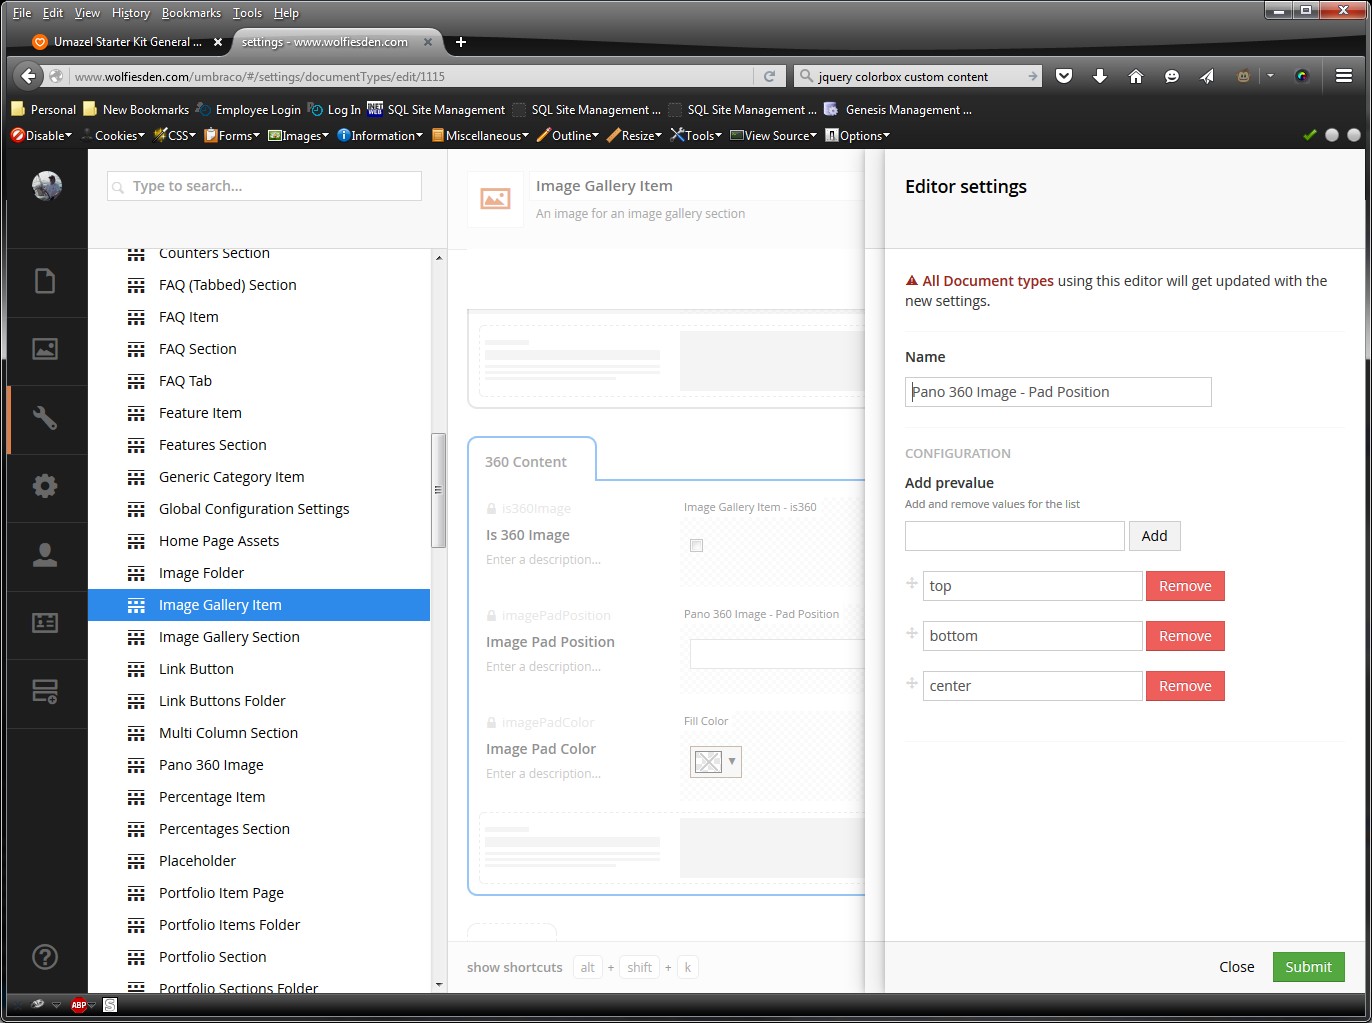
This adds a checkbox to indicate its a 360 image, an image rendering position (needed for images that are not perfectly 2:1 ratio such as those from the 360fly camera), and a color fill which is used for images that don't match the 2:1 ratio required for google vrview. If your images are all 2:1 ratio the pad nor the color will ever be evident on the page.
4: Edit siteTemplate: You need to add a snippit of code to the bottom of your siteTemplate:
You will find the two @Html lines already at the bottom. Add the Script between them.
This tells color box to render that specific class as an iframe rather than an image. You can adjust the % sizes to suit your site's layout though this remains responsive by using % instead of fixed pixel sizes. The google renderer will also adapt to the iframe size within the color box.
5: Generate Models: Generate your models using the model builder on the dev tab.
6: Edit SectionImageGallery Partial: Edit your "SectionImageGallery" partial. Add this using:
7: Further edit SectionImageGallery Partial: Also within "SectionImageGallery" partial, alter this section of code:
The "// TODO" line was present in my partial and I have included it here as a marker for you to locate the proper section of the partial.
What this section of code does is check if the 360 checkbox was checked (bool variable).
It then sets up a few strings with the default values used before so normal images render as they did before.
If its a 360 image, instead of the stock links and classes, it generates a new link to the index.html renderer along with the appropriate GetCropUrl URL to generate the new image. It adds "image360Thumb" class to the image in case you wanted to use CSS to alter its appearance in the gallery. You can, of course, target it also by using the "cbox-gallary360" which is applied to the anchor wrapping it.
Note the resize dimensions in the url. Mine are set for the default size of my 360fly camera's output which is slightly under 4k. The output size must be a 2:1 ratio or the google vr renderer will not apply it to the sphere correctly. This is the reason for the pad and the fill color as my camera produces a 360 horizontal by 270 vertical view not 360 x 360. So if your camera produces a 360 by 360 view, your width is 4096 , your height needs to be 2048 in the url above (or whatever your maximum resolution is on your camera).
I have not included any stereo or other options on the iframe url. See https://developers.google.com/vr/concepts/vrview for additional options available.
The code above also includes an overlay image as part of the new URL. You will need to enable image overlay in your imageprocessor config file and provide a PNG overlay icon. If you do not wish to use the overlay, simply comment out that line of code so you will have it as reference should you wish to re-enable it later.
I used a public free image for my initial testing. You can see the icon overlay on the last two images here:
If your entire gallery is all 360 panos, the overlay is pointless. But if you have normal images mixed with 360 panos, the user might like to see the 360 icon as an indicator on the thumbnail. It is, of course, your option whether to add the overlay or not, its not required to make this work.
8: Test: Add a 360 image from the /examples/gallery folder from the google download. Check the 360 checkbox and publish. It should render as an interactive pano. Now you can experiment with your own panos!
You can alter the index.html and style.css in your vr folder to suit your site's styling and requirements. It should work out of the box and get you going.
Hopefully I didn't miss anything :)
I won't pretend I got it all with a quick read, but I'm definitely giving you a H5YR for this! I'll study it and, why not, include it in a next update if possible. Good work! Cheers!
Thank you sir. It honestly took far longer to figure out how to do it than actually doing it :) The changes are fairly minor. Hardest was working out what to change.
You can view it in action here: http://www.wolfiesden.com/personal-photos/
I just recently got my 360 camera and I figured as I started getting nicer weather around here I would get more opportunities to go shoot (both with it on the drone and from the ground).
As you can see I had a couple test shots from a rare nice day in Feb here (back to snow and 14f temps now). I know 360 panorama stuff is becoming more and more popular so I figured there might be someone else out there with an interest in including the pano renderer on their sites. There are so few places on the web to post your panos (outside google), it seemed a natural extension of the image gallery.
I am also going to look at the portfolio and see about adding the content there too.
And I have already created a new page widget to put panos as an inline item on a page as well though that is still in testing. A demo of this can be seen here: http://www.wolfiesden.com/pano-test/ This type of insertion would be perfect for putting the pano content on more elaborate pages, perhaps a site walkthrough or other uses where a specific layout would be required which could include other content widgets such as text areas or even an image gallery in addition to the inline pano. This would be perfect as a showroom page for a business.. As I said, its not complete yet but I can share that methodology as well once its further along.
is working on a reply...